Filtering of the raw flow for validation purposes
Overview
Filtering of the raw flow is only done for validation purposes. All spirometric analyses are conducted with the raw flow signal.But a visual validation of the spirometric results can be easier with a less noisy flow signal.
Details
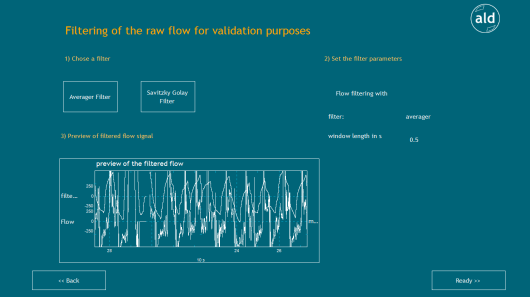
Filtering is done in three steps.1) Filter choice
2) Filter parameter adaptation
3) Preview of filtered flow signal

1) Filter Choice
Two filters can be chosen an Averager and a Savitzky Golay filter. After clicking on the desired filter, the default parameter settings are shown in the panel on the right.
Averager
The averager filter calculates the average of the flow signal in a moving window. The averager can be tried as a first choice, since it is a simple filter.

Savitzky Golay filter
The Savitzky Golay filter, see [Savitzky1964] and [Orfanidis1996] is a more advanced filter. It is also called polynomial smoothing or least-squares smoothing filter. In comparison to an averager, the Savitzky Golay filter preserves higher frequencies in the flow better. But therefore it does not remove as much noise as the averager.
2) Filter parameter adaptation
The default settings of both filters can be adapted
Averager:
-Windowlength in s (default 0.5s)
The Windowlength specifies the length of the moving window used to calculate the average values. The lager the window, the smoother is the filtered flow. But too large windows do not only remove noise from the signal, but also higher frequencies.
More parameter fitting advice can be found in the filter documentation ("Averager").
Savitzky Golay fileter:
-Windowlength in s (default 0.5s)
The Windowlength specifies the length of the moving window used to calculate the average values.
-polynomial degree (default 4)
The polynomial degree of least square fitting.
-derivative (default 0)
Derivative order of the output.
For further parametrization recommendations see the filter documentation ("Savitzky-Golay filter").
After setting all parameters, the filtering is done by clicking Apply filter settings. Then the chosen filter settings are displayed in the filter parameter panel and the filtered signal is previewed.
3) Preview of filtered flow signal
The filtered flow signal is previewed beside the raw flow signal in the preview of the filtered flow previewer.
<< Back
This button directs back to the breath triggered results review ("Breath triggered results of FLOW/PRES analysis - trendlines").
Ready >>
This button directs to a review of the filtered flow with the currently applied filter parameter setting ("Review filtered flow results"). Additionally this filtered flow is stored in combination with the breath triggered results in a file called "...filtered_flow.csv".
